")
Install Option 1: Handsets Only
*Make sure to complete all 3 steps
1. Connecting Your PHONE PLUS Cordless Handsets to the Internet
To begin, unbox your Yealink cordless handsets, connect the charging bases to power, and set the handsets in their charging bases.
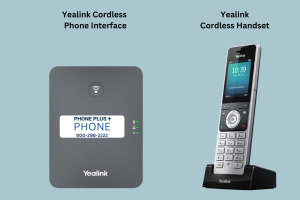
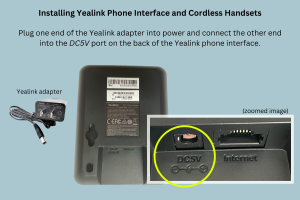
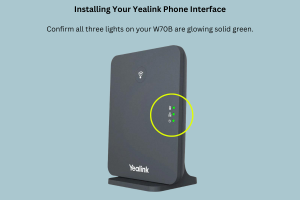
Next, identify your Yealink cordless phone interface and connect it to power.
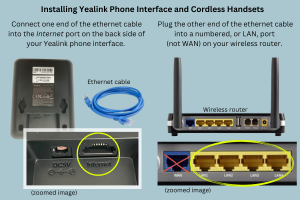
Then follow the steps to connect your Yealink phone interface to the internet.
When connecting to wireless router, do not plug ethernet cable into the WAN port.
Confirm your PHONE PLUS system is connected to the internet. Are all three lights on your Yealink phone interface glowing solid green? If so, your system is now connected to the internet.
Please do NOT unplug or throw away your old phones until your receive an email from PHONE PLUS stating that your number has been successfully ported to Premier Companies.

Now let’s test your phones to see that they are working properly.
On the paper install guide we provided, you’ll find a telephone number labeled “Temporary phone number”.
Dial that phone number to place a test call.
Confirm your system is answering incoming calls and all calls are routed properly.
2. Call Forwarding Your Published Telephone Number
*Please note: Call forwarding is only necessary for activating your PHONE PLUS service immediately. If you choose not to call forward your number, the port process will take 7-10 business days to be completed. Your PHONE PLUS service will be activated at that time, and you may now proceed to step 3: “Activating Your System”.
**Some service providers charge extra to add on call forwarding, or charge you long distance. Call your provider to determine any potential charges.
***A very small percentage of stores will not be able to call forward their number using option A. If Option A is unsuccessful, Option B or Option C can be used.
Option A: Use one of your old telephones and confirm you are calling out on line 1.
Enter ‘*72’ and wait three seconds, or listen for a short recorded message, then dial the temporary phone number from the install sheet included in your package.
Be sure to include a ‘1’ then the area code, then the 7 digit temporary number.
You will hear a confirmation tone or a short message confirming your published number is now forwarded (this verification varies by provider).
From a mobile phone, call your published number to assure you are now hearing the PHONE PLUS greeting message, and once again press ‘9’ to assure all three phones are ringing.
If your phone number has been successfully forwarded, you must now complete Step 3 to avoid paying two phone bills.
If Option A did not work, please proceed to Option B or Option C.
Option B: Call your previous phone company (not Premier Companies) directly and ask to manually call-forward your published number to the temporary number provided.
Do not hang up until you have tested the number by calling your published number from a mobile phone and are hearing the PHONE PLUS greeting message.
Option C: Log in through your online account with your current dial tone provider and call forward your main line to the temporary number we provided.
Please make sure to test that call forwarding is complete by calling your main phone number, and making sure you hear your PHONE PLUS main greeting.
*To prevent paying two phone bills, you must now complete Step 3.
3. Activating Your System: Port Form Submission
Your PHONE PLUS service is now set up and ready to use!
To activate your system, please fill out this service and license agreement.
Please note: It is imperative that you fill this form out immediately. Your phone system will not be fully operational until the form has been completed and submitted.
If you do not complete the Phone Line Port Request Form you could be paying two phone bills every month.
How to Operate Your PHONE PLUS System
We encourage you to call your published number and listen to all of your new messaging. If any changes are needed, you can notify us by visiting PremierPHONEPLUS.com/message-update.
Enjoy the relief, increased productivity, and improved customer experience with your new PHONE PLUS service.
If you have any questions or need help, please email tech@premiercompanies.com.
Don’t miss out on all of the PHONE PLUS Add-on Features!
Install Option 2: Desk Phones Only
*Make sure to complete all 3 steps
1. Connecting Your Desk Phones to Internet
Option A: Connecting to internet via router
(Scroll down to Option B to connect via PC)
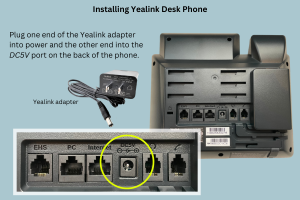
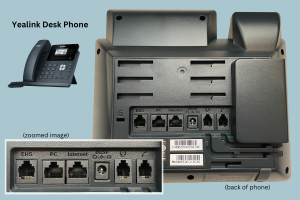
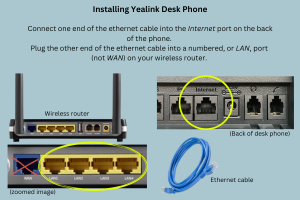
Plug one end of an ethernet cable into the INTERNET port on the back of the Yealink desk phone and plug the other end into an open port on your internet router.
When connecting to wireless router, do not plug ethernet cable into the WAN port.
Your desk phone will self provision and identify the connection to your PHONE PLUS system.
Please do NOT unplug or throw away your old phones until your receive an email from PHONE PLUS stating that your number has been successfully ported to Premier Companies.
Now let’s test your phones to see that they are working properly.
On the paper install guide we provided, you’ll find a telephone number labeled “Temporary phone number”.
Dial that phone number to place a test call.
Confirm your system is answering incoming calls and all calls are routed properly.
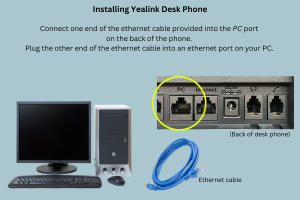
Option B: Connecting to internet via PC
Plug one end of an ethernet cable into the PC port on the back of the Yealink desk phone and plug the other end into an ethernet port on your PC.
Your desk phone will self provision and identify the connection to your PHONE PLUS system.
Now let’s test your phones to see that they are working properly.
On the paper install guide we provided, you’ll find a telephone number labeled “Temporary phone number”.
Dial that phone number to place a test call.
Confirm your system is answering incoming calls and all calls are routed properly.
2. Call Forwarding Your Published Telephone Number
*Please note: Call forwarding is only necessary for activating your PHONE PLUS service immediately. If you choose not to call forward your number, the port process will take 7-10 business days to be completed. Your PHONE PLUS service will be activated at that time, and you may now proceed to step 3: “Activating Your System”.
**Some service providers charge extra to add on call forwarding, or charge you long distance. Call your provider to determine any potential charges.
***A very small percentage of stores will not be able to call forward their number using option A. If Option A is unsuccessful, Option B or Option C can be used.
Option A: Use one of your old telephones and confirm you are calling out on line 1.
Enter ‘*72’ and wait three seconds, or listen for a short recorded message, then dial the temporary phone number from the install sheet included in your package.
Be sure to include a ‘1’ then the area code, then the 7 digit temporary number.
You will hear a confirmation tone or a short message confirming your published number is now forwarded (this verification varies by provider).
From a mobile phone, call your published number to assure you are now hearing the PHONE PLUS greeting message, and once again press ‘9’ to assure all three phones are ringing.
If your phone number has been successfully forwarded, you must now complete Step 3 to avoid paying two phone bills.
If Option A did not work, please proceed to Option B or Option C.
Option B: Call your previous phone company (not Premier Companies) directly and ask to manually call-forward your published number to the temporary number provided.
Do not hang up until you have tested the number by calling your published number from a mobile phone and are hearing the PHONE PLUS greeting message.
Option C: Log in through your online account with your current dial tone provider and call forward your main line to the temporary number we provided.
Please make sure to test that call forwarding is complete by calling your main phone number, and making sure you hear your PHONE PLUS main greeting.
*To prevent paying two phone bills, you must now complete Step 3.
3. Activating Your System: Port Form Submission
Your PHONE PLUS service is now set up and ready to use!
To activate your system, please fill out this service and license agreement.
Please note: It is imperative that you fill this form out immediately. Your phone system will not be fully operational until the form has been completed and submitted.
If you do not complete the Phone Line Port Request Form you could be paying two phone bills every month.
How to Operate Your PHONE PLUS System
We encourage you to call your published number and listen to all of your new messaging. If any changes are needed, you can notify us by visiting PremierPHONEPLUS.com/PPscripts.
Enjoy the relief, increased productivity, and improved customer experience with your new PHONE PLUS service.
If you have any questions or need help, please email tech@premiercompanies.com.
Don’t miss out on all of the PHONE PLUS Add-on Features!
Install Option 3: Handsets + Desk Phones
*Make sure to complete all 4 steps
1. Connecting Your PHONE PLUS Cordless Handsets to the Internet
To begin, unbox your Yealink cordless handsets, connect the charging bases to power, and set the handsets in their charging bases.
Next, identify your Yealink cordless phone interface and connect it to power.
Then follow the steps to connect your Yealink phone interface to the internet.
When connecting to wireless router, do not plug ethernet cable into the WAN port.
Confirm your PHONE PLUS system is connected to the internet. Are all three lights on your Yealink phone interface glowing solid green? If so, your system is now connected to the internet.
Please do NOT unplug or throw away your old phones until your receive an email from PHONE PLUS stating that your number has been successfully ported to Premier Companies.
Once your Yealink phone interface is connected to the internet, you can now connect your Yealink deskphones.
2. Connecting Your Desk Phones to Internet
Option A: Connecting to internet via router
(Scroll down to Option B to connect via PC)
Plug one end of an ethernet cable into the INTERNET port on the back of the Yealink desk phone and plug the other end into an open port on your internet router.
When connecting to wireless router, do not plug ethernet cable into the WAN port.
Your desk phone will self provision and identify the connection to your PHONE PLUS system.
Please do NOT unplug or throw away your old phones until your receive an email from PHONE PLUS stating that your number has been successfully ported to Premier Companies.
Now let’s test your phones to see that they are working properly.
On the paper install guide we provided, you’ll find a telephone number labeled “Temporary phone number”.
Dial that phone number to place a test call.
Confirm your system is answering incoming calls and all calls are routed properly.
Option B: Connecting to internet via PC
Plug one end of an ethernet cable into the PC port on the back of the Yealink desk phone and plug the other end into an ethernet port on your PC.
Your desk phone will self provision and identify the connection to your PHONE PLUS system.
Please do NOT unplug or throw away your old phones until your receive an email from PHONE PLUS stating that your number has been successfully ported to Premier Companies.
Now let’s test your phones to see that they are working properly.
On the paper install guide we provided, you’ll find a telephone number labeled “Temporary phone number”.
Dial that phone number to place a test call.
Confirm your system is answering incoming calls and all calls are routed properly.
3. Call Forwarding Your Published Telephone Number
*Please note: Call forwarding is only necessary for activating your PHONE PLUS service immediately. If you choose not to call forward your number, the port process will take 7-10 business days to be completed. Your PHONE PLUS service will be activated at that time, and you may now proceed to step 4: “Activating Your System”.
**Some service providers charge extra to add on call forwarding, or charge you long distance. Call your provider to determine any potential charges.
***A very small percentage of stores will not be able to call forward their number using option A. If Option A is unsuccessful, Option B or Option C can be used.
Option A: Use one of your old telephones and confirm you are calling out on line 1.
Enter ‘*72’ and wait three seconds, or listen for a short recorded message, then dial the temporary phone number from the install sheet included in your package.
Be sure to include a ‘1’ then the area code, then the 7 digit temporary number.
You will hear a confirmation tone or a short message confirming your published number is now forwarded (this verification varies by provider).
From a mobile phone, call your published number to assure you are now hearing the PHONE PLUS greeting message, and once again press ‘9’ to assure all three phones are ringing.
If your phone number has been successfully forwarded, you must now complete Step 3 to avoid paying two phone bills.
If Option A did not work, please proceed to Option B or Option C.
Option B: Call your previous phone company (not Premier Companies) directly and ask to manually call-forward your published number to the temporary number provided.
Do not hang up until you have tested the number by calling your published number from a mobile phone and are hearing the PHONE PLUS greeting message.
Option C: Log in through your online account with your current dial tone provider and call forward your main line to the temporary number we provided.
Please make sure to test that call forwarding is complete by calling your main phone number, and making sure you hear your PHONE PLUS main greeting.
*To prevent paying two phone bills, you must now complete Step 3.
4. Activating Your System: Port Form Submission
Your PHONE PLUS service is now set up and ready to use!
To activate your system, please fill out this service and license agreement.
Please note: It is imperative that you fill this form out immediately. Your phone system will not be fully operational until the form has been completed and submitted.
If you do not complete the Phone Line Port Request Form you could be paying two phone bills every month.
How to Operate Your PHONE PLUS System
We encourage you to call your published number and listen to all of your new messaging. If any changes are needed, you can notify us by visiting PremierPHONEPLUS.com/PPscripts.
How to use your new desk phone
Enjoy the relief, increased productivity, and improved customer experience with your new PHONE PLUS service.
If you have any questions or need help, please email tech@premiercompanies.com.
Don’t miss out on all of the PHONE PLUS Add-on Features!