Installing Your PHONE PLUS Fax Interface
There are 4 options for installing your fax interface.
Scroll down this page to see the instructions and diagrams below to determine which option is most optimal for your network/fax/print setup.
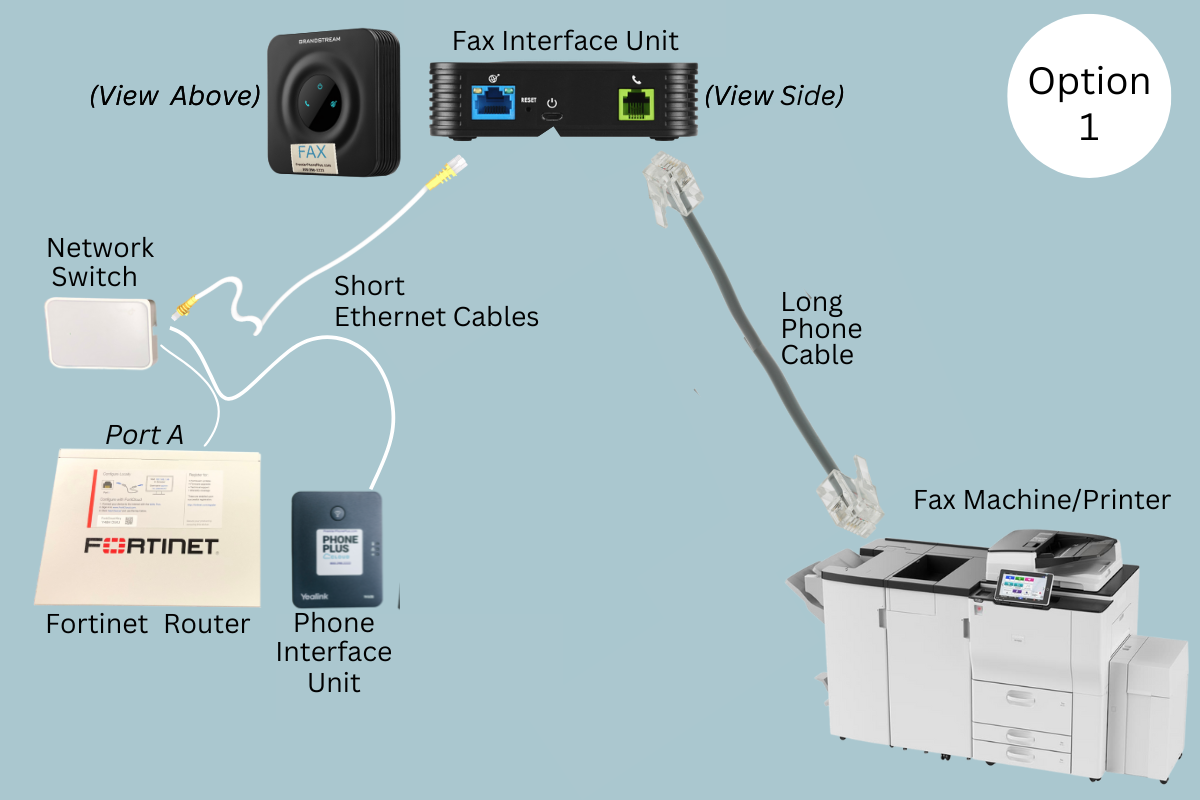
Option 1 – Your fax machine is more than 3′ away from your
Fortinet router and network switch (diagram below)
*This option requires a 30′ phone cable (not included) which can be run from the fax interface unit to the fax machine along the floor, on the wall, or through the ceiling tiles.
- Unbox your PHONE PLUS fax interface equipment (see images 1 and 2). You will find the Grandstream fax interface, power cable, 6′ phone cable, and 3′ ethernet cable.
- Locate your PHONE PLUS Yealink phone interface (see image) near your Fortinet router.
- Locate the ethernet cable plugged into the Yealink phone interface, trace that ethernet cable, and locate the network switch it is plugged into.
- Plug one end of the new ethernet cable into that network switch, and the other end of the ethernet cable into the blue ethernet port of your PHONE PLUS Fax interface.
- Plug one end of the 30′ phone cable into the green phone port of your fax interface, and the other end of the cable into the ‘Line In’ port of your fax machine.
Are you using a Brother fax machine?
Yes? Click Here for further instruction.
No? Continue to step 6. - Send an outbound fax and confirm it was received.
- Contact your current dial tone provider and ask them to call forward your current fax number to the temporary number provided in your installation email.
- CLICK HERE to fill out the Port Request Form. Once the port request is complete, we will reach out with final instructions.
*If you have already completed this form previously to include your fax number, this port request is not necessary.


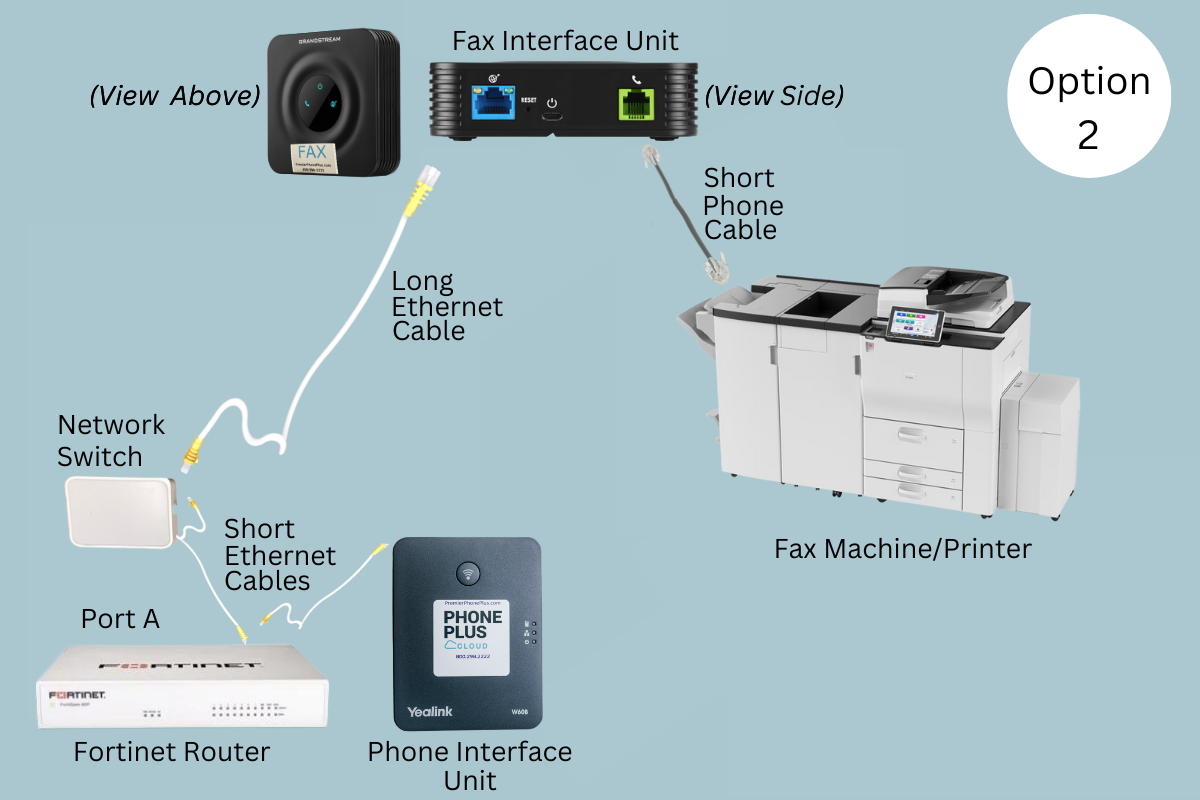
Option 2 – Your fax machine is located more than 3′ away from your
Fortinet router and network switch (diagram below)
*This option requires a 30′ ethernet cable (not included) which can be run from the fax interface to the fax machine along the floor, on the wall, or through the ceiling tiles.
- Unbox your PHONE PLUS Fax equipment (see images 1 and 2). You will find the fax interface, power cable, 6′ phone cable, and 3′ ethernet cable.
- Locate your PHONE PLUS Yealink phone interface (see image) near your Fortinet router.
- Locate the ethernet cable plugged into the Yealink phone interface, trace that ethernet cable, and locate the network switch it is plugged into.
- Plug one end of the 30′ ethernet cable into that network switch.
- Plug the other end of the 30′ ethernet cable into the blue ethernet port of your new fax interface (see images), which you will place near the fax machine.
- Plug one end of the 6′ phone cable into the green phone port of your fax interface, and the other end into your fax machine.
Are you using a Brother fax machine?
Yes? Click Here for further instruction.
No? Continue to step 7. - Send an outbound fax and confirm it was received.
- Contact your current dial tone provider and ask them to call forward your current fax number to the temporary number provided in your installation email.
- Request an inbound fax be sent to you and confirm it is delivered to your email.
- CLICK HERE to fill out the Port Request Form. Once the port request is complete, we will reach out with final instructions.
*If you have already completed this form previously to include your fax number, this port request is not necessary.


Option 3 – Your fax machine is located less than 3′ away from your
print computer and network switch (diagram below)
- Unbox your PHONE PLUS fax equipment. You will find the fax interface (see images 1 and 2), power cable, 6′ phone cable, and 3′ ethernet cable.
- Locate the network switch located at or near your print computer.
- Plug one end of the 3′ ethernet cable into that network switch.
- Plug the other end of the 3′ ethernet cable into the blue ethernet port of your new fax interface.
- Plug one end of the 6′ phone cable into the green phone port of your fax interface, and the other end into your fax machine.
Are you using a Brother fax machine?
Yes? Click Here for further instruction.
No? Continue to step 6. - Send an outbound fax and confirm it was received.
- Contact your current dial tone provider and ask them to call forward your current fax number to the temporary number provided in your installation email.
- Request an inbound fax be sent to you and confirm it is delivered to your email.
- CLICK HERE to fill out the Port Request Form. Once the port request is complete, we will reach out with final instructions.
*If you have already completed this form previously to include your fax number, this port request is not necessary.


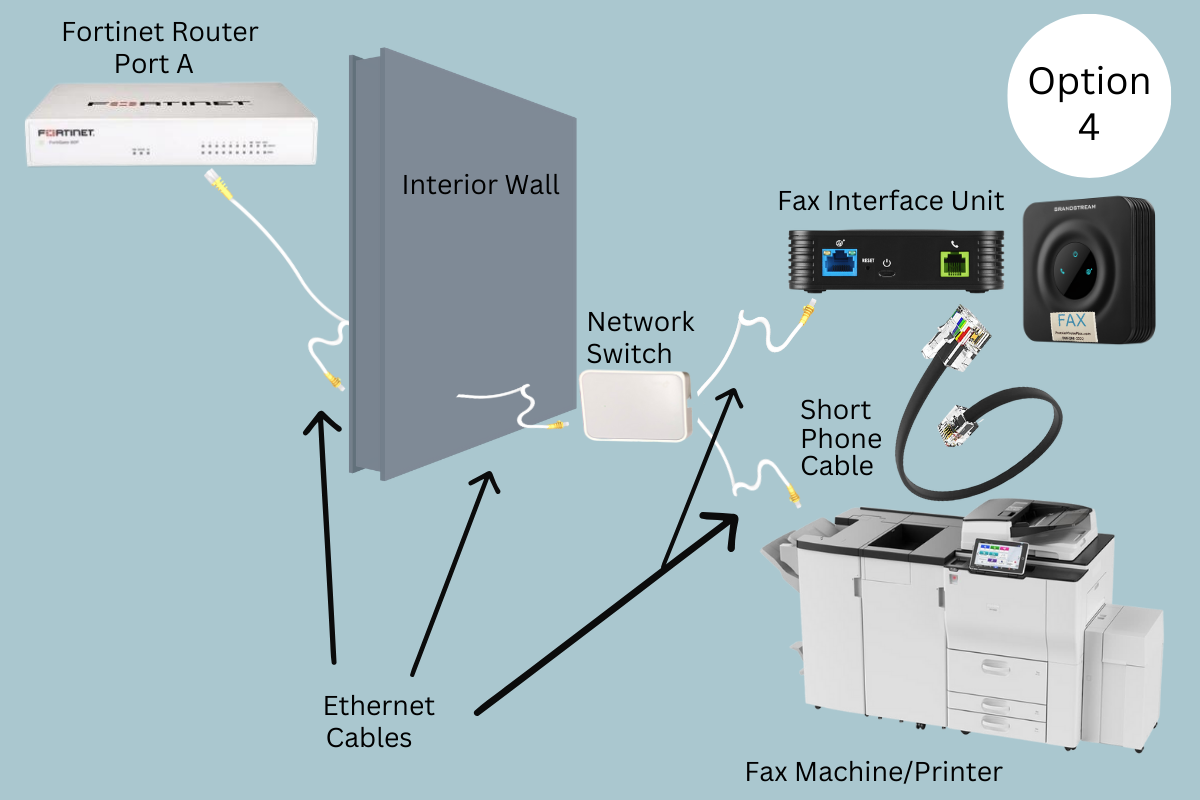
Option 4 – Your fax machine is connected to the internet via ethernet cable coming from the wall (diagram below).
- Unbox your PHONE PLUS Fax equipment. You will find the PHONE PLUS Fax interface (see images 1 and 2), a power cable, a 6′ phone cable, and a 3′ ethernet cable.
- Locate the ethernet cable connected to the internet port of your printer.
- Trace the cable to the wall where the ethernet cable is connected to a wall jack.
- Unplug the ethernet cable from the wall, and plug your new 3′ ethernet cable into the wall.
- Plug your TP link network switch into power, and plug the free end of the 3′ ethernet cable into any port in that network switch.
- Now plug your original ethernet cable into the any port of that network switch.
- Plug one end of an additional ethernet cable into any port in the network switch, then plug the other in to the blue ethernet port of your new fax interface.
- Plug one end of the 6′ phone cable into the phone port of your fax interface, and the other end into the green phone port of your fax machine.
Are you using a Brother fax machine?
Yes? Click Here for further instruction.
No? Continue to step 9. - Send an outbound fax and confirm it was received.
- Contact your current dial tone provider and ask them to call forward your current fax number to the temporary number provided in your installation email.
- Request an inbound fax be sent to you and confirm it is delivered to your email.
- CLICK HERE to fill out the Port Request Form. Once the port request is complete, we will reach out with final instructions.
*If you have already completed this form previously to include your fax number, this port request is not necessary.


